Graflex Series B
Stationary Back 5 x 7
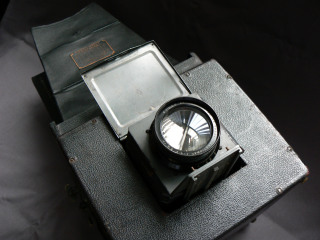
Huge Reflex Camera long 25,5 cm x 24 cm wide x 23 high
Horizontal 5x7 Stationary Back .
1923 - 1942
5x7 Graflex Camera Series B. This is the camera type used by the National Geographic in the teens and twenties.
The patent numbers run from 1902 to 1909.
The shutter is the roller blind type up to 1/1000 of a second.
The camera is equipped with the famous Graflex Focal Plane shutter (1/10 to 1/100 sec + T ) and has a similar body, including the concave curved front, as the famous (1918-1923) Auto Graflex 5x7. The Series B camera misses the enclosure standard around the lens board such as the Series D, permitting interchangeable lenses. Instead the Series B is equipped with the pop open lens cover. Like its predecessor it misses the revolving back. Rack the lens out with the focusing pinion S, which causes the lens cover to open instantly, exposing the lens.
Focusing
The focusing hood opens automatically by pressing forward on the spring-catch directly opposite forward end of handle allowing the cover to open. Press the two side arms down to draw the focusing hood taut. Set the mirror by pressing lever H down until it locks in focusing position. Turn the focusing knob until the lens cover pops open. You may see now an image on the ground glass. Focus the object by turning the focus knob for-or backwards. Set the diaphragm by turning the diaphragm ring on the lens to the appropriate number. Set the shutter speed according the aperture you found on the camera tag on front of the hood. s.
The curtain apertures
The shutter curtain contains 5 apertures ranging from full open O to 1/8 of an inch. When the letter O appears in the window next to the winding key the (focal plane) shutter is wide open. The other apertures 1½, ½, ¾, 3/8, and 1/8 follow in rotation at window F as key is turned to the left. The shutter speed plate attached to the focusing hood gives the approximate shutter speeds in fractional parts of seconds, obtainable with the various combinations of curtain apertures and tension number
Setting the shutter
To set the shutter speed, push down lever H. Slide the bar D to the left, exposing I. indicating instantaneous exposure. Wind the curtain by turning key A to the left, until the required aperture appears at F. If the curtain is set at a smaller aperture than required release the curtain by pressing the release button marked M backward. Repeat this procedure until the proper aperture is registered at window F.
Caution
A safely lock prevents the winding of the curtain before the mirror is set in position.
This prevents fogging of the film, making it necessary to set the mirror before rewinding the shutter curtain.
Regulating the shutter speed
Tension on the curtain is regulated by turning the milled head B to the right until the required tension number appears at G. The numbers run from 1 to 6, the highest number indicating the greatest speed. If the tension number is set at a higher tension than required, release the tension of the spring by pressing escapement P up und down until the proper tension number is registered at window G. Example: for an exposure 1/235 of a second, register curtain aperture 3/8 at window F and tension 5 at window G.
Instantaneous Exposures
After the shutter has been set, and the image on the ground-glass focusing screen properly focused, the exposure is made by one gentle, downward pressing of the release lever, located on the forward left hand side of the camera body. The pressure on the lever simultaneously releases the mirror and curtain. Slow instantaneous exposures of about 1/5 second can be made with the curtain set at O (full opening) and tension 1. Pressure upon the shutter release causes the mirror to rise just before the curtain drops and thus closing the exposing aperture. When making slow instantaneous exposures the camera should be properly supported on a table or tripod.
Time exposures
Press down lever H and slide the bar D to the right exposing letter T indicating Time exposures. Wind the curtain until the letter T is registered at window F. After focusing the image release the mirror and commence the exposure by a gentle backward pressure on button M. At the expiration of the required time, terminate the exposure by a second pressure on button M.
The Graflex series B is equipped with a Kodak Anastigmat f= 4,5 - 8 ½ inch.
The closest working distance is 26 inch.
Diaphragm 4,5- 5,6- 6,3-8-11-16-22-32
8 1/2 inch # 34779.
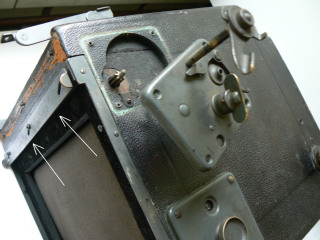
How to get access to the Focal Plane curtain.
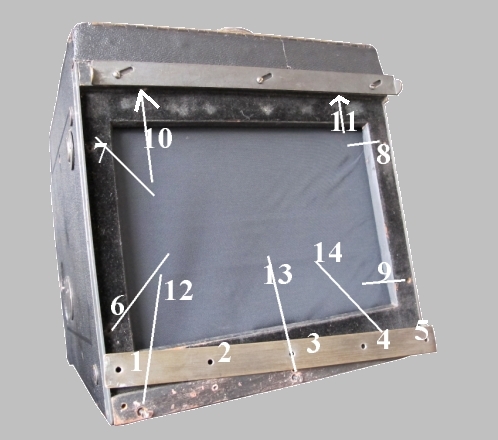
The exposure back
panel can be easily removed by unscrewing fourteen screws of the frame panel.
No. 10 and 11 on top hidden on top near the sliding lock.
Nos 6 to 9 on the
left and on the right of the open frame.
1,2,3 and 4 on the brass lock strip giving access to 3 screws 12,13 and 14.
Keep all screws apart to replace them on the right way later on.
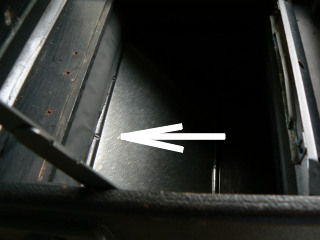
Now you've got access to the two rollers.
Warning: do not
take off the curtain from the rollers unless absolutely necessary.
Repair instructions
To remove the upper panel which includes the winding key and the mirror setting lever:
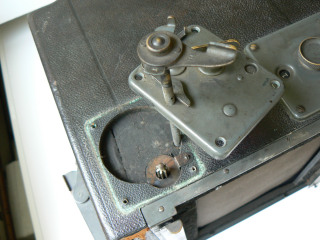
Open the camera and remove the focusing hood. Carefully remove the springs holding the focusing ground glass. Remove the ground glass. Remove the mirror setting handle by removing the taper pin by using a drive pin punch. If that doesn't work (which happens quite often) and the Mirror Setting handle can not be removed, you'd have to loosen the shaft of the mirror mechanism by unscrewing the four screws above the mirror. On the opposite side of the camera you find the round spring assembly box attached by 3 screws to the camera body. Unscrew the 3 screws one by one while holding the disc shaped box under pressure. After unscrewing the last screw let the round box or assembly slip back in neutral position. Remove the assembly from the camera. Now the shaft can be pulled out by the mirror setting lever.
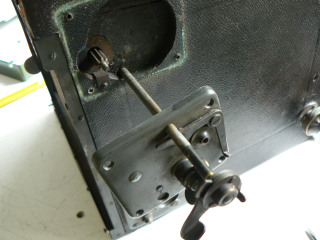
To remove the lower panel
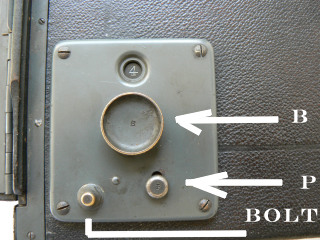

First release the tension of the lower roller by repeatedly moving knob P upward until figure 1(one) is visible in the window. Unscrew the panel but leave the upper right screw. Unscrew the bolt and place screwdriver in the slit of the shaft. While holding the screwdriver in this position unscrew the last screw and tilt the panel. You'll now notice the tension on the screwdriver and you may let slip the screwdriver through your fingers until the tension is released. Now you can lift the plate assembly . Clean the mechanism and use a tiny bit of oil to make it work smooth again. Check the good working of the lower roller.
To remount the upper panel roll the curtain until it is in open position. Make sure that the upper edge of the curtain matches with the upper edge of the camera exposure opening. The figure in the window of the upper panel has to be "O" . Find the right docking where the gear of the upper roller shaft meets the tooth wheel with the figures. Replace the four screws. Now replace the shaft into the hole and slide it as far as possible. Make sure that the mirror is down and the position of the lever H is down. Replace the four screws in the shaft on the upper side of the mirror. If that is done you have to release the mirror so that is stays in high position. In this position you need less power to finish the next step, the most difficult part of the operation. You may need any help of somebody with strong hands. The fact is that replacing the round box with the mirror spring is quite a job. You will have to turn the disc shaped box clockwise two or three positions. I used a pair of sharp pointed tweezers to turn the disc shaped box into its position.
Remounting the lower assembly.
Set counter on position (1) one. Replace the panel and place screwdriver through the hole of the panel in the slit of the gear of the shaft. Grab panel between thumb and forefinger and lift it so that you can freely turn the shaft with the screwdriver without that the counter-mechanism is connected to the gear of the shaft. Turn the shaft anti clockwise until the spring tension is fairly high. While holding the tension on the shaft with the screwdriver, replace the panel by letting it down. The mechanism will immediate snap to the gear thus preventing that the spring in the shaft releases. You'll be able to replace one or two screws and check the shutter speed. The shutter speed will be fine if the curtain closes from position Open to Close when pressing the release button and the window shows tension 2. To increase the tension you may repeat the previous procedure until the curtain drops nicely from the O to the close position. Each time you release the shutter, you'll have to reset the mirror.
More about the working of the spring
Even if your classic camera seems to be in good condition and ready to use, you may soon find out that the focal plane shutter is slow or even worse, has pinholes
The above link to the page is very helpful if you intend to renew your focal plane shutter cloth or want to speed up the exposure time.

Before you decide to pick up your Graflex Series B to hike you'd
better think twice.
The Graflex Series B camera weights almost 5 Kg. including the film sheet or
glass holder.
Svante, Signe and Sixten